Sunday, April 15, 2012

Old-Fashioned Cupcakes with Buttercream Frosting


I want to share something with you that I stole from my brother's house today that made me incredibly happy.


For me, nothing beats the lilac's smell and it's most definitely my favorite flower. I just wanted to share with you that they are officially out and about. Sniff them while you can people, they aren't here long. If someone wanted to bottle one of the most familiar smells of my childhood it would be the smell of the lilac. My grandparents, who lived across the woods from us, had huge lilac bushes that spread out across the areas on both sides of their driveway. If I remember correctly, my grandfather hated the smell of those flowers, but I can't/couldn't get enough of them.

Getting back on track, I also wanted to share with you my new favorite birthday cupcake! I've made these cupcakes a few times now, and they have turned out every single time. I recently got The Back in the Day Bakery Cookbook and it is awesome. And cute. There are very few cookbooks where I've wanted to bake every single thing in them. This is definitely one of those books for me. The cool thing about these cupcakes is that it's a one bowl kind of deal. Easy clean-up, man. I had never made a cupcake that you mixed the butter in with all the dry ingredients right off the bat. Normally the flour and such is added towards the end. For me, this way makes the baking process that much easier. I love it. I'm not exactly sure how doing it this way benefits the cupcake, but it's working.

After making the frosting that pairs with these cupcakes, I found my new favorite. Holy smokes it's good. This buttercream recipe also makes a ton of frosting so feel free to apply generously on top of each tiny cake. These cupcakes are soft and moist and have a really great flavor. They have a fine crumb and are a little bit messy, but so worth the few crumbs on your shirt when you've finished. I hope you get a chance to make these!

Old-Fashioned Cupcakes with Buttercream Frosting

1 cup whole milk
1 teaspoon pure vanilla extract
1 3/4 cups cake flour
1 1/4 cups unbleached all-purpose flour
2 cups sugar
1 tablespoon baking powder
3/4 teaspoon fine sea salt
1/2 pound (2 sticks) unsalted butter, cut into 1/2-inch cubes, at room temperature
4 large eggs, at room temperature

Directions:

Preheat the oven to 350°F. Line 24 cupcake cups with paper liners.

In a large measuring cup or a small bowl, mix together the milk and vanilla and set aside.

In the bowl of a stand mixer fitted with the paddle attachment, combine both flours, I sifted them, and then the sugar, baking powder, and salt and mix on low speed for 2 to 3 minutes, until thoroughly combined. With the mixer on low speed, add the cubed butter a few pieces at a time, mixing for about 2 minutes, until the mixture resembles coarse sand. There might be a few larger chunks of butter left, but that's OK. With the mixer on medium speed, add the eggs one at a time, mixing well after each addition.

Turn the speed to low, seriously low, and gradually add the milk and vanilla, then mix for another 1 to 2 minutes.

Remove the bowl from the mixer and  incorporate any ingredients that may have gathered at the bottom and sides of the bowl, making sure the batter is completely mixed.

With a large ice cream scoop or spoon, scoop the batter into the prepared cupcake cups, filling each baking cup about two-thirds full. I prefer to use the ice cream scoop, just depends on personal preference.  Bake for 20 to 25 minutes, until a cake tester inserted in the center of a cupcake comes out clean. My oven leans more towards the 25-30 minute mark. So keep your eye on them after 20 minutes or so. Let cool for at least 20 minutes.

Buttercream Frosting
2 sticks unsalted butter, at room temperature
6 to 7 cups confectioners’ sugar
1/2 cup whole milk
2 teaspoons vanilla extract

Directions:
In the bowl of a stand mixer fitted with the paddle attachment (or in a large mixing bowl, using a handheld mixer), cream the butter on medium speed until light and fluffy, 2 to 3 minutes. Add 4 cups of the confectioners’ sugar, the milk, and vanilla and mix on low speed until smooth and creamy, 2 to 3 minutes. Gradually add up to 3 cups more sugar, mixing on low speed, until the frosting reaches the desired light and fluffy consistency, 3 to 5 minutes.

Using a spatula or a butter knife, spread the tops of the cupcakes with swirls of frosting. Top with sprinkles, if desired. The cupcakes can be stored in an airtight container at room temperature for up to 2 days.


Thursday, April 5, 2012

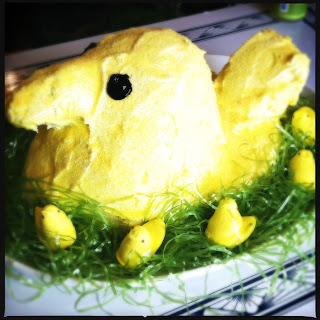
Giant Peep Cake


Sometimes I feel sorry for the Peep. I feel like it's the one Easter candy people love to hate. I was one of those people who hated on the Peep until a while ago after I had actually tried one. It's marshmallow, people. That's all. It just happens to be covered in sugar and have no taste. Three years ago I was with my nephew at the Target in downtown Minneapolis. It was a few weeks before Easter and we were cruising the candy isle because that is apparently what we like to do together. Tommy, my then 8 year old nephew, spotted an entire section dedicated to Peeps and in that section was every color Peep you could imagine. So, naturally, we bought them all. In the end we probably ended up with all of the colors in the rainbow and they all ended up tasting the exact same. I think he was a little bummed to find out that they weren't different flavors, just chemically colored different. I love that kid. When I see Peeps hitting the candy isle every spring I think of Tommy.....and my mother.

My mother is another Peep-eater. Four Easters ago I watched her put one in the microwave first before she ate it. What?? She said it tasted better. First, how can it taste any different? Second, why would someone ever try that out to begin with? But, I guess I shouldn't ask such silly questions. As kids we received Easter baskets from the Easter Bunny every year until we moved out of the house. In those baskets would be a sleeve of Peeps. None of us would ever end up eating them so my mother would have a stack of Peeps to herself by the end of the day. Funny how things work out that way. 

I saw this cake in the new issue of Food Network Magazine and I thought to myself, 'who in the hell would make this?', and that's when I decided that I would be the one. It made me laugh and think of good memories I've had with Peeps, so that's why I ended up wanting to make it. Just because it made me smile. Hope it does the same for you. Happy Easter!

Giant Peep Cake

Yellow Cake
Adapted from Smitten Kitchen
*Food Network used boxed cake mixes. I did not. I like to do things the hard way.
**Note: you have to make two recipes of this cake to complete the peep cake.

Ingredients:
4 cups plus 2 tablespoons cake flour (not self-rising)
2 teaspoons baking powder
1 1/2 teaspoons baking soda
1 teaspoon table salt
2 sticks unsalted butter, softened
2 cups sugar
2 teaspoons pure vanilla extract
4 large eggs, at room temperature
2 cups buttermilk, well-shaken

Cake Baking Directions:

Preheat oven to 350°F. Butter and flour a 9-by-13-inch cake pan plus a 1-quart and 2 1/2-quart ovenproof bowl. Make both cake mixes; divide the batter among the pan and bowls.

Sift together flour, baking powder, baking soda, and salt in a medium bowl. (sifting rocks!) In a large mixing bowl, beat butter and sugar with an electric mixer at medium speed until pale and fluffy, then beat in vanilla. Add the eggs 1 at a time, beating well after each addition. Beat in buttermilk until just combined on low speed. Add flour mixture in three batches, mixing until each addition is mixed in. Don't over mix.

Bake at 350 degrees until a toothpick comes out clean, about 35 minutes for the pan and small bowl, and about 50 minutes for the large bowl. Let the cakes cool 15 minutes in the pan and bowls, then unmold onto racks to cool completely.

Ingredients for Frosting and Decorations:

1 1/2 cups sugar
1/2 teaspoon cream of tartar
Pinch of salt
3 large egg whites
1/2 teaspoon vanilla extract
1/4 teaspoon almond extract
1 teaspoon yellow food coloring
Yellow sanding sugar, for coating
black piping frosting

Directions for building the cake:

Trim the flat sides of the bowl cakes with a serrated knife to make level. They may have gotten a little uneven on top while baking. You want them flat so it's easy to stack. Using a chef's knife, cut the 4 corners off the rectangular cake and set aside three of the cake triangles for the tail and beak.

Put the flat cake on a cake board or platter and use toothpicks to attach two cake triangles to a short end for the tail. Position the large bowl cake on the flat cake as shown, then top with the small bowl cake; insert a skewer through the cakes to secure. Trim another cake triangle to make a beak; attach to the small bowl cake with toothpicks.

Make the frosting:

Heat the sugar with the cream of tartar, salt and 2/3 cup water in a saucepan, stirring, until dissolved. Beat the egg whites with a mixer until frothy. Slowly, seriously slowly, beat in the hot sugar mixture, then increase the mixer speed and beat until stiff peaks form, about 7 minutes. Beat in the vanilla and almond extracts and the food coloring.

Cover the cake with a thick layer of the yellow frosting, using the frosting to sculpt a rounded chick shape. This frosting actually works really great for shaping. With the edge of an offset spatula, use some frosting to extend the beak and tail. Coat the cake with yellow sanding sugar. Refrigerate, uncovered, 15 minutes. Draw circles/ovals for the eyes with black frosting. Remove the skewer and toothpicks as you cut the cake.


Good Luck.