
If you have self-diagnosed yourself with ADD, as I have, don't make these butterfly cupcakes. The cupcake itself is easy to make but the chocolate butterfly takes patience, patience and more patience. I, unfortunately, have very little of it. These cupcakes look so pretty, but I will never see them in my house again, not unless one of my very brave friends tries to make them and brings one over.
I made these cupcake a few years ago when I first started baking and it was on a very hot summer day for a friend's picnic, which was a giant mistake. The chocolate butterfly wings that you have to make are very temperamental. Hot sun equals melting disaster, and when it's hot enough in the kitchen to make you sweat, it's to hot for candy melts. Baking candy melts are little round pieces of chocolate that come in many different colors and flavors, and you melt them in the microwave so you can pipe them into a mold or a design. Watch out, because in very little time they harden back to solid chocolate. Work fast!! These little suckers also melt very easily on hot days. I've learned my lesson. I'm not going to lie, when I made these this weekend there were several distasteful words that came out of my mouth. Sorry, Ma.
I made these cupcake a few years ago when I first started baking and it was on a very hot summer day for a friend's picnic, which was a giant mistake. The chocolate butterfly wings that you have to make are very temperamental. Hot sun equals melting disaster, and when it's hot enough in the kitchen to make you sweat, it's to hot for candy melts. Baking candy melts are little round pieces of chocolate that come in many different colors and flavors, and you melt them in the microwave so you can pipe them into a mold or a design. Watch out, because in very little time they harden back to solid chocolate. Work fast!! These little suckers also melt very easily on hot days. I've learned my lesson. I'm not going to lie, when I made these this weekend there were several distasteful words that came out of my mouth. Sorry, Ma.
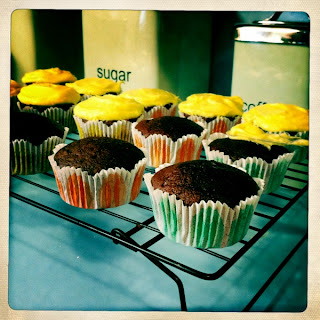
When I made these the first time I used canned frosting and boxed cupcake mix. Hey, don't judge, I had just started baking! But I've learned over the last few years that nothing compares to a homemade cupcake. In all honesty, it doesn't take that much more time to make them from scratch than it does from a box. Also, the homemade cupcakes won't fall apart while you're eating them like the boxed ones. Those are all just fluff. This time I chose a simple chocolate cupcake from Martha Stewart. Now, I love Martha, but I will admit not all of her recipes work for me. Actually, a lot more than I'd like to admit. So, believe me when I say this one is super easy and it works out great.
I'm a really big fan of cream cheese frosting. In fact, it's my favorite. I love the tang and sweetness of it, so naturally, that's what I chose to use with the chocolate cupcake. It's so easy to make and it tastes so much better when you make it yourself, just like the cupcake. I'm not bragging here, I honestly do feel if you just put in a little more effort you will get something that tastes that much more amazing. Also, by making it yourself you know exactly what you're putting into it. I can't even understand some of the ingredients that the Betty Crocker lady is putting into her frosting which allows it to sit on the supermarket shelf for months.
The moment you've been waiting for! You get to finally see the process that had me wanting to rip my hair out. Here are the instructions for the 'Monarchs', and It's from the book 'Hello, Cupcake!'. The title of the book sounds so cute, but don't let it deceive you...
What you need :
24 chocolate cupcakes (recipe follows)
2 cups dark cocoa melting wafers
2 cups orange melting wafers
3 tablespoons white nonpareils
3/4 cup chocolate frosting (recipe follows)
2 cups vanilla frosting tinted yellow (recipe follows)
brown candy-coated chocolates (M&M's)
1. Place the templates for the wings and antennae, which I'll give you a picture of, on 2 or 3 cookie sheets lined with wax paper.

2. Place 1 cup of each the dark cocoa and orange melting wafers into separate ziplock bags. Do not seal the bags. Microwave for 10 seconds to soften. Massage the wafers in the bags, return to the microwave, and repeat the process until the candy is smooth, about 1 minute total. Press out the excess air and seal the bags.
3. Snip a 1/16-inch corner from each bag. Working on one wing at a time and using the melted dark cocoa, outline the template on wax paper. Go over the outline several times to thicken. Fill in with the orange melted candy. Tap the pan slightly to flatten. Using a round toothpick, pull the dark cocoa into the orange to create the wing design. While the candy is still liquid, sprinkle the upper portion of the dark cocoa outline with the white nonpareils. Repeat with the remaining melted candy, melting additional wafers as needed. Reheat the candy in the microwave for several seconds if it becomes too thick. Place the cookie sheets in the refrigerator until set, about 5 minutes. Follow the same procedure to make the antennae, using only the melted dark cocoa.
4. Spoon the chocolate frosting into a ziplock bag, press out the excess air, seal, and set aside. Tint the vanilla frosting pale yellow with the food coloring. Spread the yellow frosting on top of the cupcakes.
5. Carefully peel the chilled wings and antennae from the wax paper. Place 2 brown chocolate candies, 1/2 inch apart, on top of the cupcakes to form supports for the wings. Press the inside edge of a pair of wings into the frosting about 1/4 inch apart, allowing the wings to lean on the chocolate candies. Gently press the antennae into the frosting at the head of the butterfly. Snip a 1/8-inch corner from the bag with the chocolate frosting. Starting at the antennae, pipe 4 or 5 beads of frosting down the length of the body, drawing the frosting into a small point on the last bead.
6. Let out a deep breath.

Chocolate Cupcakes:
Ingredients
3/4 cup unsweetened Dutch-process cocoa powder
3/4 cup hot water
3 cups all-purpose flour
1 teaspoon baking soda
1 teaspoon baking powder
1 1/4 teaspoons coarse salt
1 1/2 cups (3 sticks) unsalted butter
2 1/4 cups sugar
4 large eggs, room temperature
1 tablespoon plus 1 teaspoon pure vanilla extract
1 cup sour cream, room temperature
Cream Cheese Frosting:
3/4 cup hot water
3 cups all-purpose flour
1 teaspoon baking soda
1 teaspoon baking powder
1 1/4 teaspoons coarse salt
1 1/2 cups (3 sticks) unsalted butter
2 1/4 cups sugar
4 large eggs, room temperature
1 tablespoon plus 1 teaspoon pure vanilla extract
1 cup sour cream, room temperature

Cream Cheese Frosting:
8 ounces cream cheese, at room temperature
12 tablespoons (1 1/2 sticks) unsalted butter, at room temperature
1/2 teaspoon pure vanilla extract
3 1/2 cups sifted confectioners' sugar
Place the cream cheese, butter and vanilla in the bowl of an electric mixer fitted with the paddle attachment, and mix on medium speed just until combined. Don't whip! Add the sugar and mix until smooth.
Chocolate Cream Cheese Frosting:
8 ounces cream cheese, at room temperature
12 tablespoons (1 1/2 sticks) unsalted butter, at room temperature
1/2 teaspoon pure vanilla extract
1/2 cup cocoa powder
2 1/2 cups sifted confectioners' sugar
Place the cream cheese, butter and vanilla in the bowl of an electric mixer fitted with the paddle attachment, and mix on medium speed just until combined. Again, don't whip! Add the cocoa powder and sugar, mix until smooth.
Directions
Preheat oven to 350 degrees. Line standard muffin tins with paper liners. Whisk together cocoa and hot water until smooth. In another bowl, whisk together flour, baking soda, baking powder, and salt.
Melt butter with sugar in a saucepan over medium-low heat, stirring to combine. Remove from heat, and pour into a mixing bowl. With an electric mixer on medium-low speed, beat until mixture is cooled, 4 to 5 minutes. Add eggs, one at a time, beating until each is incorporated, scraping down sides of bowl as needed. Add vanilla, then cocoa mixture, and beat until combined. Reduce speed to low. Add flour mixture in two batches, alternating with the sour cream, and beating until just combined after each.
Divide batter evenly among lined cups, filling each three-quarters full. Bake, rotating tins halfway through, until a cake tester inserted in centers comes out clean, about 20 minutes. Transfer tins to wire racks to cool 15 minutes; turn out cupcakes onto racks and let cool completely. Cupcakes can be stored overnight at room temperature, or frozen up to 2 months, in airtight containers.

If you make these, I will be dying to hear how they went. I hope they go wonderfully, but if they don't, we can commiserate together.
I am just getting caught up on your posts. I've got a lot of baking to do to try everything!! What a delight to read these recipes of yours Mary. The narrative and story's to go with are very entertaining as well I must say. Keep going girl....I am recruiting readers daily!!
ReplyDeleteKaren Naastad